Two of my newer students, Joseph and Stephen, both came in recently wanting the same thing: to play that big 6th-string major barre chord. The F chord. The one that makes many people want to throw their guitar out a window.
They could get the shape. They could put their fingers in roughly the right places. But when they strummed? Dead notes everywhere. Buzzing. That awful thunk instead of a clean chord.
Sound familiar?
Here’s what happened next: with me standing right there watching their hands, making small adjustments, and giving them immediate feedback, both Joseph and Stephen got every single note in that barre chord to ring out clean. In one lesson.
Now, can they whip out an F chord in the middle of a song and switch to it seamlessly? Not yet. Switching to it cleanly from other chords, at tempo, without stopping to think. That takes training and reps. But they’re past the biggest hurdle. They know they can do it, because they already did it. And I know they’ll get there, because I’ve helped hundreds of people just like them master these chords before. And with an experienced instructor keeping them on track, they’ll get there a whole lot faster than trying to figure it out on their own.
The difference between “I can’t play barre chords” and “every note rings clean” came down to one thing: left-hand position. And that’s what this article is about.
Why Barre Chords Are Hard
Most people don’t realize what they’re asking their hand to do.
You’re pressing multiple strings down with one finger while maintaining precise positioning with the others. This requires finger strength you haven’t developed yet, hand positioning that feels unnatural at first, coordination between pressure and placement, and calluses on the side of your index finger that don’t exist yet.
None of this happens overnight. Anyone telling you barre chords are “easy once you know the trick” is either lying or has forgotten how hard they were to learn.
But here’s what Joseph and Stephen proved: the problem isn’t that barre chords are impossible. It’s that without someone correcting your specific issues in real time, you end up fighting your own hand instead of working with it.
Build Your Calluses
The side of your index finger — the side closest to your thumb — needs to toughen up. Tougher skin means less pressure required to hold the strings down.
Speed this up: gently rub the side of your index finger on the strings for about a minute daily. Do it in 10-second intervals between other practice items.
Don’t overdo it. Excessive friction heats up your skin and causes pain. Little and often is the approach.
This isn’t the fun part. It’s necessary preparation.
Start with Open Chord Shapes (Without Your Index Finger)
Before attempting barre chords, practice these open shapes without using your index finger: E major, E minor, A major, and A minor.


For the A shape, use your third finger to press all three strings (D, G, B strings) simultaneously. This prepares your hand for the flattened finger positions needed in barre chords.
Practice moving these shapes up the neck — form the E major shape at the 3rd fret, then 5th fret, then 7th fret. Do the same with Em, A, and Am.
Get comfortable forming and moving these four shapes before adding the barre. If you can’t do this confidently, you’re not ready for the next step. That’s not an insult — it’s how skill development works. You build layers, not shortcuts.
Start with the 6th String Major Barre (the F shape)
Once you can confidently form and move those four open shapes up the neck, you’re ready to add the barre.
The F major barre chord is your starting point. Build it in steps:
Step 1: Get your guitar position right. This is critical and most students skip it. You need classical guitar positioning for anything this difficult. Sit upright, no armrests on your chair. Use a footstool to elevate your left leg (right-handed players). Guitar’s lower bout rests on your left thigh. Neck angles upward about 45 degrees, headstock around shoulder height or slightly higher.
This is the same position rock players achieve by putting their foot on the monitor during solos. It looks cool, but it serves a real purpose — optimal hand positioning.


Step 2: Start at the 5th fret, not the 1st. The first fret is the hardest spot due to higher string tension. Don’t torture yourself starting there. Fifth fret is much more manageable (assuming your guitar is properly set up).
Step 3: Index finger on 6th string only. Place your index finger barring just the low E string. Leave the top two strings open. Form the rest of the E shape with your other fingers — the shape you’ve already been practicing.
This creates a unique sound (Rush and Dream Theater use this voicing). Get comfortable here before moving on.
Step 4: Add the barre. Position your other fingers first to form the chord shape. Then add the barre with your index finger. The barre doesn’t need a death grip. Just slight pressure using the side of your index finger.
Step 5: Use arm weight, not grip strength. Stop squeezing the neck with excessive force. Relax your shoulder. Let your elbow move freely. Use the natural weight of your arm pulling back on the strings.
If you can’t do this, you’re too tense. Consciously relax and use dead weight instead of muscular force. Don’t bend the strings.
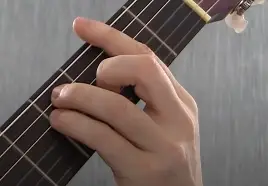
Proper Hand Position
Thumb placement: Keep your thumb behind your middle finger on the back of the neck — “hitchhiker position.”
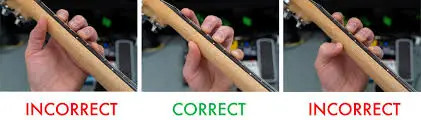
Finger arching: Your other fingers (not the barre finger) need to arch to avoid muting adjacent strings.
Relax your hand. Press gently. Stop if you feel too much tension.
When starting, correct hand position matters more than perfect-sounding chords. Get used to the feel first. Clean sound comes later.
This is exactly where Joseph and Stephen were struggling. They had the right idea about what to do — they’d watched enough videos to know the basics. What they couldn’t see was that their thumbs were too high, their knuckles were tilted, and they were squeezing instead of using arm weight. Three small corrections, and suddenly every note rang clean.
Practice Switching Between Barre Chords
Once you can form one barre chord, switching between them becomes the next challenge.
Isolate your fretting hand: Use a metronome. Focus on switching shapes without strumming. Just the hand movements.
Add the picking hand: Once your fretting hand feels confident, add strumming. Strum in time even if the chord isn’t entirely clean at first.
Alternate practice modes: Spend a few minutes on fretting-only practice, then full strumming practice. This builds muscle memory and control separately before combining them.
Common Mistakes I See
Trying to form full barre chords immediately. Build in steps. Index on 6th string first, then add the barre.
Starting at the 1st fret. Start at the 5th fret where tension is lower.
Wrong guitar position. Trying to play barre chords with the guitar in casual position makes it significantly harder. Use classical positioning.
Squeezing instead of using arm weight. Tension creates fatigue and poor sound. Relax and use natural weight.
Giving up too soon. Barre chords take weeks to months to feel comfortable. That’s normal. Everyone goes through this.
Not building calluses. Skipping the finger conditioning means you need more pressure, which creates more fatigue.
Why This Is Hard to Learn Alone
You can’t see your own hand position clearly.
You think your thumb is in the right place. It’s not — it’s too high or too far forward. You think you’re using arm weight. You’re not — you’re squeezing with grip strength. You think your fingers are arched properly. They’re not — they’re muting adjacent strings.
A teacher watching your hand corrects these issues immediately before they become ingrained habits. Without that feedback, you might practice incorrectly for weeks, reinforcing the wrong patterns and wondering why it’s not getting easier.
That’s why Joseph and Stephen didn’t figure out barre chords from a YouTube video. They figured them out with someone watching their hands in real time, saying “tilt your wrist slightly” and “roll your index finger a hair to the left” and “there — hear the difference?” Those tiny, real-time corrections are the difference between struggling for months and getting it in one session.
The Bottom Line
Barre chords are hard. In the beginning.
Build calluses. Start with open shapes. Use proper guitar positioning. Begin at the 5th fret. Use arm weight, not grip strength.
Practice consistently. Give it weeks, not days. Don’t expect overnight results.
This article gives you the framework. But if barre chords still feel impossible after consistent correct practice, you probably need what Joseph and Stephen needed — someone standing right there, watching your hands, making the corrections you can’t see yourself.
If you’re ready to finally master barre chords and get this behind you, click the button below.

About The Author
Brian Fish is a professional guitarist who has been dedicated to helping other guitar players in Northeast Ohio pursue their musical dreams since 1994. He’s passionate about guiding others on their musical journey! He is the Guitar Playing Transformation Specialist, instructor, mentor, trainer, and coach at
Guitar Lessons Geauga.
Brian has also assisted people from around the globe in developing a solid sense of timing and enhancing their creativity through the fantastic rhythm course, “Ultimate Rhythm Mastery,” available at MusicTheoryForGuitar.com.
If you live in Geauga County / North East Ohio, Guitar Lessons Geauga can help you become the player you’ve always wanted to be.