I met a guy at an open mic night in Newbury a while back. We’ll call him Steve to protect his identity. He told me he’d been playing for years, had a lot of really nice guitars, but could use a little help cleaning some things up. He called me that following Monday to set up a lesson.
When he came in, his left hand was a mess. Knuckles tilted, fingers flat against the fretboard, thumb death-gripping the neck. He struggled with most open position chords — dead notes everywhere. His scales were rough. He couldn’t use his pinky at all because his hand position made it basically useless.
Every issue he had traced back to the same root cause: bad left-hand technique. And all of it was fixable.
But every time I pointed something out, I got the same answer: “Well, this is how it feels comfortable to me.”
I didn’t take him on as a student. If someone won’t take my advice, I can’t help them. I’m not going to stand there collecting a lesson fee while watching someone reinforce the exact habits that are holding them back.
Here’s the thing about “comfortable” — your hands don’t know what’s correct, they only know what’s familiar. And if you’ve been playing with bad hand position for any length of time, the wrong way will feel comfortable. That doesn’t make it right. It just means you’ve gotten used to fighting your own anatomy.
This article covers what proper left-hand position actually looks like, why it matters, and what it costs you when you ignore it.
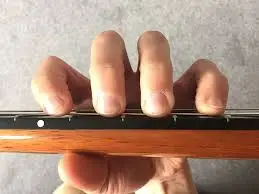
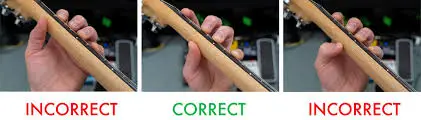
The One Thing Almost Everyone Gets Wrong: Knuckle Alignment
If I could only fix one thing about a student’s left hand, this would be it. Your knuckles need to run parallel to the neck. Not tilted. Not angled. Parallel.
I’d estimate that 9 out of 10 self-taught players who walk through my door have their knuckles tilted at some angle. They don’t even realize it’s happening. And it’s silently sabotaging everything they try to play.

When your knuckles are tilted, your third finger and pinky are at a huge disadvantage — they can’t reach where they need to go without straining. Your hand has to work twice as hard to do half as much. Stretches that should be comfortable become painful. Chord shapes that should be straightforward become impossible.
When your knuckles are properly aligned? Your entire hand works as one unit. Every finger has equal reach. Stretches open up. Complex passages smooth out. Things that felt hard suddenly feel natural — not because you got stronger, but because you stopped fighting your own anatomy.
This was Steve’s core problem. It wasn’t strength. It wasn’t hand size. It was alignment. And because he wouldn’t let me fix it, every other issue — the dead notes, the useless pinky, the rough lead breaks — stayed right where they were.
Supporting Role: Your Thumb
Once your knuckles are squared up, your thumb’s job is to provide gentle support from the back of the neck — roughly opposite your index and middle fingers, angled slightly, relaxed.
Here’s what I see constantly: players gripping the neck like they’re trying to choke it. White knuckles. Thumb jammed into the wood. That kind of tension doesn’t just make your hand tired — it actively prevents your fingers from moving the way they need to. You can’t be fast and tense at the same time. It’s physically impossible.
Now, there are times when wrapping your thumb over the top of the neck makes sense — Hendrix-style chord embellishments, bending strings, certain blues phrasing. But those are specific techniques for specific moments, not a default hand position. If your thumb lives over the top of the neck all the time, you’re trading away reach, speed, and clean tone for a habit that feels comfortable but costs you everywhere.
Finger Curvature: Why Flat Fingers Kill Your Sound
Your fingers should arch over the fretboard with a natural curve — think about holding a softball. You’re pressing with your fingertips, not the flat pads of your fingers.


This matters more than most people realize. When your fingers lay flat, they brush against adjacent strings and mute notes that should be ringing. That’s why your chords sound muddy. That’s why your D chord has that one dead string. That’s why your barre chord attempts sound so bad.
I tell my students: your fingers need to be good neighbors. They should stay in their own lane, arched up and out of the way of the strings they’re not supposed to be touching. The only time a finger should touch a string is on purpose.
The tricky part? You can’t see this from behind the guitar. You feel like your fingers are curved. But from the front, they’re laying flat and muting the B string. This is one of those things where having a trained set of eyes watching you makes all the difference.
Where You Press Matters More Than How Hard You Press
This one surprises people: most guitarists press way too hard. When notes aren’t ringing clean, the natural instinct is to press harder. But most of the time, pressing harder isn’t the fix — pressing in the right spot is.
Where you press within each fret space has a much bigger impact on sound quality than how much pressure you use. The sweet spot is just behind the fret wire — not on top of it, not way back in the middle of the fret. Just behind it. When you land in that spot, you need surprisingly little pressure to get a perfectly clean note.
Players who press too hard wear themselves out, create unnecessary tension in their hands, and actually make it harderto play fast or switch chords smoothly. All that extra force is wasted energy. It’s like trying to drive with the parking brake on — you’ll still move, but everything is harder than it needs to be.
Wrist Position: The Thing Nobody Talks About Until It Hurts
Your wrist ties everything together. A bad wrist angle can undo all the good work you’ve done with your knuckles, thumb, and fingers.
The goal is a neutral, relaxed wrist that lets your fingers approach the fretboard naturally. For scale work, dropping the wrist slightly helps your fingers arch properly. For barre chords, small adjustments are fine. What you want to avoid are extreme angles — a sharply bent wrist puts pressure on tendons and nerves, and over time, that’s how players end up with real injuries that take them off the instrument for weeks or months.
One of the most effective ways to get your wrist into a good position is to use the classical guitar position — holding the guitar at roughly a 45-degree angle with the neck elevated. I know, I know. It doesn’t look as cool as slinging the guitar low like a rock star. But when you hold the guitar this way, your wrist falls naturally into an ergonomic angle that maximizes reach and minimizes strain. Your fingers approach the fretboard at their most efficient angle without you having to force anything.
If you’re feeling wrist pain or fatigue, this is the first thing I’d look at. And I’d look at it now, not after it becomes a real problem.


Why Reading About This Only Gets You Halfway There
Here’s the truth about everything I just wrote: knowing it and doing it are two completely different things.
You can read this article ten times. You can memorize every point. And your knuckles will still tilt without you noticing. Your fingers will still flatten out when you’re concentrating on a chord change. Your thumb will still death-grip the neck the second things get challenging. These habits are invisible to the person doing them.
That’s what Steve wouldn’t let me do for him. Stand there, watch his hands in real time, and say “tilt your wrist slightly” or “straighten those knuckles” or “there — hear the difference?” Those tiny, real-time corrections can often fix the problem in a single lesson. It may take a few weeks for it to become a new habit and feel natural, but the correction itself? That happens fast. But they only work if you’re willing to trust the process and let someone who’s fixed this hundreds of times before actually fix it.
After thirty years of teaching, I can tell you: the information isn’t the hard part. The hard part is applying it correctly, consistently, under the pressure of actually trying to play music. That’s what a good instructor does for you. Not just tell you what to do, but watch you do it and fix the things you can’t see yourself.
If you’re in Geauga County or Northeast Ohio and you’ve been fighting your left hand every time you pick up the guitar, let’s fix it. I offer a free trial lesson where I can see exactly what’s going on with your technique and show you what’s possible when things are lined up properly.

About The Author
Brian Fish is a professional guitarist who has been dedicated to helping other guitar players in Northeast Ohio pursue their musical dreams since 1994. He’s passionate about guiding others on their musical journey! He is the Guitar Playing Transformation Specialist, instructor, mentor, trainer, and coach at Guitar Lessons Geauga.
Brian has also assisted people from around the globe in developing a solid sense of timing and enhancing their creativity through the fantastic rhythm course, “Ultimate Rhythm Mastery,” available at MusicTheoryForGuitar.com.
If you live in Geauga County / North East Ohio, Guitar Lessons Geauga can help you become the player you’ve always wanted to be.